RubyスクリプトからSSHコマンドを実行してみる
ブログの更新がずいぶんしてなかったのですが、
最近ようやくやる気も徐々に出てきて、何かやろうかなぁと思って、
Rubyを使ってリモート操作したいなぁと思い立ってとりあえずSSHコマンドを叩いてみることにしました。
まずは、インストールから
% jruby -S gem install net-ssh
ここで注意で、依存関係の問題から次が自動でインストールされないので、一緒にインストールします。
% jruby -S gem install jruby-pageant
LoadError: no such file to load --jruby_pageant
のようなメッセージが出たら、上記のインストールが足りていないと思われます。
準備が整いました。
では、SSHコマンドを叩くhello worldプログラムを動かしてみます。
Net::SSH.start('ホスト名', 'ユーザ名', :password => 'パスワード') do |ssh|
  puts ssh.exec!('ls ~')
end
実行したらちゃんとlsコマンドが動きました。
これは、いろいろと応用ができそうです。
JRubyFXでWebブラウザを作ってみる
JavaFxになってSwingと比べてWebViewのエンジンが強化されているようです。
SwingでJavascriptとかHTML5とかがうまく動かなかったのがJavaFXではちゃんと動くっぽいです。
まずは簡単なWeb表示
require 'jrubyfx'

class App < JRubyFX::Application
  def start(stage)
    with(stage, width: 800, height: 600, title: 'sample') do
      layout_scene do
        web_view do |v|
          v.engine.load "http://google.com/"
        end
      end
      show
    end
  end
end

App.launch
BackボタンとURLバーを作ってみる
デザインにこだわっていないので、見た目がよくないですが。。
require 'jrubyfx'

class App < JRubyFX::Application

  DefaultURL = "http://google.com/"

  def start(stage)
    with(stage, width: 800, height: 600, title: 'sample') do
      layout_scene do
        vbox do
          hbox do
            button(id:"back", text:"back", min_width: 80)
            text_field(id:"url", pref_width: 800)
          end
          web_view(id:"browser") do |v|
            v.engine.load DefaultURL
          end
        end
      end
      show
    end

    #戻るボタン
    stage['#back'].set_on_action do
      stage["#browser"].engine.history.go(-1)
    end

    #入力したURLへ移動する
    stage['#url'].set_on_action do
      stage["#browser"].engine.load stage['#url'].text
    end

    # URLを表示する
    stage['#browser'].engine.get_load_worker.state_property.add_change_listener do |ov, os, new_state|
      if new_state == Worker::State::SUCCEEDED
        stage['#url'].text = stage['#browser'].engine.get_location
      end
    end
   end
end

App.launch
これはいい!JRubyFX+SceneBuilder(fxml)を使ったGUI開発
JRubyFXはJavaFxをRubyっぽく書けますが、
そこにプラスしてfxmlを使うとよりGUI開発が簡単になります。
ここではJRubyFXでfxmlを使う方法をメモとして残します。
まずはJRubyでfxmlをロードする
Scene Builderを使って、適当にhello.fxmlというファイルを作成したあと、
JRubyFXにfxmlを読み込まそうとすると以下のようになります。
require 'jrubyfx'
require 'jrubyfx-fxmlloader'

fxml_root File.dirname(__FILE__)

class Main < JRubyFX::Application
  def start(stage)
    with(stage, title: "sample", fxml: SimpleController ) do
    end.show
  end
end

class SimpleController
  include JRubyFX::Controller
  fxml "hello.fxml"
end

Main.launch
次にonActionでラベルに表示してみる
記述を改良します。
require 'jrubyfx'
require 'jrubyfx-fxmlloader'

fxml_root File.dirname(__FILE__)

class Main < JRubyFX::Application
  def start(stage)
    with(stage, title: "sample", fxml: SimpleController ) do
    end.show
  end
end

class SimpleController
  include JRubyFX::Controller
  fxml "hello.fxml"

  # fxmlの「onAction="#click_btn"」対応する
  on :click_btn do
    puts "pushed!!!"
    @view.text = "Pushed!!!"    # fxml1の「fx:id="view"」に対応する
  end
end

Main.launch
SceneBuilderでButtonを作成したあと、SceneBuilder上の右側の情報「Code:」 の中から「On Action」に"click_btn"を書きます。
つぎに、SceneBuilderでLabelを作成したあと、SceneBuilder上の右側の情報「Code:」の中から「fx:id」に"view"を書きます。
このとき、単なる"id"と間違えないようにしてください(「Properties」のほうの"id"じゃないです)
Ruby実装のTclインタプリタを作ってみた
Ruby実装のTclインタプリタを探していたのですが、
libtclのバインディングしか見つからなくって、しかたなく自分でつくってみました。
いろいろと手抜きはありますが、それなりに実装できたっぽいので以下に公開します。
https://github.com/zuk74/pico-tcl
まだコマンドは一部しか実装できていませんが
set, puts, expr, if, for, while
とかはなんとなく動きます。
ただし、exprやwhile文の条件式は、rubyのevalをそのまま使っているのでTcl仕様にはなっていません。
のちのち改良できたらいいなと思っています。
コーディングはいろいろ悩んで結局ここまで作るのに1週間もかかってしまいました。
モチベーションが続けば、コマンドやサポート機能も増やしていければと思います。
JRubyでODEをはじめてみる2
オリジナルのODEにはdrawstuffというデモ用のGUIキット?が含まれています。
ode4jにもありがたいことにdemoのjarの中にdrawstuffが隠れています。
今回はdemoに含まれているdrawstuffを利用します。
ode4jのdrawstuffはLWJGLライブラリが使用されているので準備します。
http://lwjgl.org/download.php
lwjgl-2.9.1.zip
まずはdrawstuffの動作確認
require 'ode4j/core-0.2.8.jar'
require 'ode4j/demo-0.2.8.jar'
require 'lwjgl/jar/lwjgl.jar'
require 'lwjgl/jar/lwjgl_util.jar'

DrawStuff = org.ode4j.drawstuff.DrawStuff
DsFunctions = org.ode4j.drawstuff.DrawStuff.dsFunctions

class TestSim < DsFunctions

  def start
  end

  def command(cmd)
  end

  def step(pause)
  end

  def stop
  end
end

DrawStuff::dsSimulationLoop(ARGV, 400,300, TestSim.new)
実行は次のようにします。
lwjglはネイティブライブラリが必要なためパス指定を付けてあげます。
たとえば以下はMacOS の場合です。
- 実行
 $ ls lwjgl/macosx
libjinput-osx.jnilib
liblwjgl.jnilib
openal.dylib

 $ jruby-1.7.9 -J-Djava.library.path=lwjgl/macosx hoge2.rb
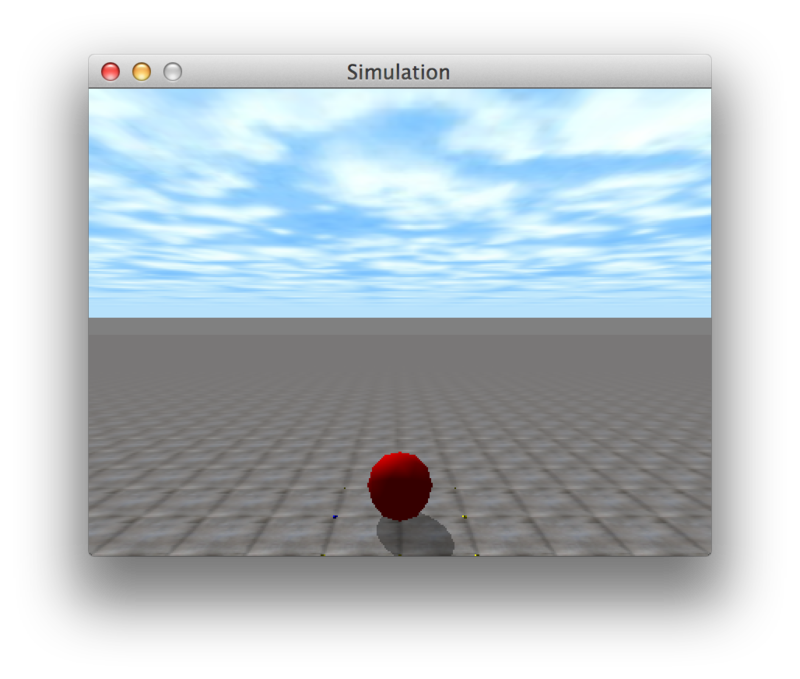
(GUI)ボールの落下
以下のソースでひとまず格好がつきました。
require 'ode4j/core-0.2.8.jar'
require 'ode4j/demo-0.2.8.jar'
require 'lwjgl/jar/lwjgl.jar'
require 'lwjgl/jar/lwjgl_util.jar'

#for ODE
OdeHelper = org.ode4j.ode.OdeHelper
DContactJoint = org.ode4j.ode.DContactJoint
DContactBuffer = org.ode4j.ode.DContactBuffer
OdeConstants = org.ode4j.ode.OdeConstants
#for Drawstuff
DrawStuff = org.ode4j.drawstuff.DrawStuff
DsFunctions = org.ode4j.drawstuff.DrawStuff.dsFunctions

class TestSim < DsFunctions

  MAX_CONTACTS = 4

  def nearCallback(data,o1,o2)
    b1 = o1.getBody
    b2 = o2.getBody

    until b1 or b2 or !OdeHelper.areaConnectedExcluding(b1,b2,DContactJoint.class)
      return
    end

    contacts = DContactBuffer.new(MAX_CONTACTS)

    MAX_CONTACTS.times do |n|
      contact = contacts.get(n)
      contact.surface.mode = OdeConstants.dContactBounce |
                            OdeConstants.dContactSoftCFM
      contact.surface.mu = OdeConstants.dInfinity
      contact.surface.bounce = 0.1
      contact.surface.bounce_vel = 0.1
      contact.surface.soft_cfm = 0.01
    end

    numc = OdeHelper.collide(o1,o2,MAX_CONTACTS,contacts.getGeomBuffer)
    if numc != 0
      numc.times do |n|
        c = OdeHelper.createContactJoint(@world,@cgroup,contacts.get(n))
        c.attach(b1,b2)
      end
    end
  end

  def init
    @world = OdeHelper.createWorld
    @world.setGravity(0.0, 0.0, -9.8)
    @world.setCFM(0.001)
    @space = OdeHelper.createHashSpace
    #@space = OdeHelper.createSimpleSpace(nil)
    @cgroup = OdeHelper.createJointGroup

    floor = OdeHelper.createPlane(@space, 0.0, 0.0, 1.0, 0)

    ball_body = OdeHelper.createBody(@world)
    ball_body.setPosition(0.0, 0.0, 10.0)
    ball_mass = OdeHelper.createMass
    ball_mass.setSphereTotal(1.0, 0.5)
    ball_body.setMass(ball_mass)
    @ball = OdeHelper.createSphere(@space, 0.5)
    @ball.setBody(ball_body)
  end

  def start
    xyz = [-6.0,0,3.0]
    hpr = [0.0,0.0,0.0]
    DrawStuff::dsSetViewpoint(xyz,hpr)

    init
  end

  def command(cmd)
  end

  def simLoop(pause)
    @space.collide(nil, Proc.new{|data,o1,o2|
        nearCallback(data,o1,o2)
    })
    if !pause
#      @world.step(0.02)
      @world.quickStep(0.02)
    end
    @cgroup.empty

    pos = @ball.getPosition.toFloatArray
    puts "pos - #{pos[0]} #{pos[1]} #{pos[2]}"

    DrawStuff::dsSetColor(1,0,0)
    DrawStuff::dsDrawSphere(
        @ball.getPosition,
        @ball.getRotation,
        0.5)
  end

  def step(pause)
    simLoop(pause)
  end

  def stop
  end
end

#OdeHelper.initODE
OdeHelper.initODE2(0)

DrawStuff::dsSimulationLoop(ARGV, 400,300, TestSim.new)
作りはかなり雑です。
全くといっていいほどRubyらしく書けてません。
つっこむところはいろいろありそうですが、とりあえず、やりたいことの第一歩としてはよいのかなと。
JRuby+ODE という組み合わせは如何なものかと思いますが、利点をあげるとするならば
という感じでしょうか。
ただし、おそらくオリジナルODEよりは動作はおそくなるだろうなーと。
その辺はいろいろ試す中でみていこうと思います。
JRubyでODEをはじめてみる
物理計算エンジンOpen Dynamics Engine (ODE) をRubyでやりたい!という前々から願望があり、いろいろ調べているうちにJRubyならどうだろうということで試してみました。
ODEはC/C++のライブラリですが、探してみるとJava版も存在しているようです。
Java版ODE: ode4j
http://www.ode4j.org
ode4jはメンテナンスが行き届いているようでちゃんとこの時点で最新であるODE-0.12.0に対応しています。
また、APIもJava版にアレンジされていますがオリジナルよりももしかするときれいにまとまっていて扱いやすそうです。
で、JavaのライブラリならばJRubyでも使えるぞ、ということでチャレンジしてみました。
(CUI)自由落下、衝突なし
まずは、GUIなしで試してみます。
require 'core-0.2.8.jar'

OdeHelper = org.ode4j.ode.OdeHelper


OdeHelper.initODE

world = OdeHelper.createWorld
world.setGravity(0.0, 0.0, -9.8)

body = OdeHelper.createBody(world)
body.setPosition(0.0, 0.0, 10.0)

1000.times do
  world.step(0.01)

  pos = body.getPosition.toFloatArray
  puts " pos - #{pos[0]} #{pos[1]} #{pos[2]}"

  break if pos[2] < 0.0
end
サイトからcore-0.2.8.jarをダウンロードしてきたら、rubyスクリプトと同じ場所に置きます。
実行すると、
$ jruby-1.7.9 hoge.rb
(CUI)自由落下、衝突あり
次に、衝突ありを試してみます。
require 'core-0.2.8.jar'

OdeHelper = org.ode4j.ode.OdeHelper
DContactJoint = org.ode4j.ode.DContactJoint
DContactBuffer = org.ode4j.ode.DContactBuffer
OdeConstants = org.ode4j.ode.OdeConstants

MAX_CONTACTS = 4

def nearCallBack(data,o1,o2)

  b1 = o1.getBody
  b2 = o2.getBody

  until b1 or b2 or !OdeHelper.areaConnectedExcluding(b1,b2,DContactJoint.class)
    return
  end

  contacts = DContactBuffer.new(MAX_CONTACTS)

  MAX_CONTACTS.times do |n|
    contact = contacts.get(n)
    contact.surface.mode = OdeConstants.dContactBounce |
                           OdeConstants.dContactSoftCFM
    contact.surface.mu = OdeConstants.dInfinity
    contact.surface.bounce = 0.1
    contact.surface.bounce_vel = 0.1
    contact.surface.soft_cfm = 0.01
  end

  numc = OdeHelper.collide(o1,o2,MAX_CONTACTS,contacts.getGeomBuffer)
  if numc != 0
    numc.times do |n|
      c = OdeHelper.createContactJoint(@world,@cgroup,contacts.get(n))
      c.attach(b1,b2)
    end
  end
end

#OdeHelper.initODE
OdeHelper.initODE2(0)

@world = OdeHelper.createWorld
@world.setGravity(0.0, 0.0, -9.8)
@world.setCFM(0.001)
@space = OdeHelper.createHashSpace
#@space = OdeHelper.createSimpleSpace(nil)
@cgroup = OdeHelper.createJointGroup

floor = OdeHelper.createPlane(@space, 0.0, 0.0, 1.0, 0)

ball_body = OdeHelper.createBody(@world)
ball_body.setPosition(0.0, 0.0, 10.0)
ball_mass = OdeHelper.createMass
ball_mass.setSphereTotal(1.0, 0.5)
ball_body.setMass(ball_mass)

ball = OdeHelper.createSphere(@space, 0.5)
ball.setBody(ball_body)

# sim-loop
500.times do |i|

  @space.collide(nil, Proc.new{|data,o1,o2|
      nearCallBack(data,o1,o2)
  })
#  @world.step(0.02)
  @world.quickStep(0.02)
  @cgroup.empty

  pos = ball_body.getPosition.toFloatArray
  puts "#{'%4d'%i}: pos - #{pos[0]} #{pos[1]} #{pos[2]}"

end
collideのnearCallbackの部分はdemoを参考に作成してみました。
いろいろとハマりましたがもとのODEがわかっていればそれほど難しくはなかったです。
JRubyとODEの組み合わせって興味あるひとどのくらいいるのだろうか。
Windowsで簡単にRedmine on JRubyをデプロイするメモ
WindowsにてRedmineを立ち上げる方法はいろいろあると思います。
ネットで検索かければいろいろ紹介されていると思います。
ここでは、
- 誰でも手軽に
- インストールに手間をかけず
- 持ち運びが容易な(ポータブル)
方法を目標にします。
データベースの選択は、jdbcsqlite。 <= なぜならWindowsにインストールしなくてすむから。
あと環境変数も、今回は設定しないで進めます。
ダウンロードからRedmine起動まで
jruby-bin-1.7.4.zip
redmine-2.3.2.zip
ダウンロードできたら、適当な場所に展開します。
説明をわかりやすくするため、ここでは以下のように展開します。
c:\redmine-2.3.2
c:\redmine-2.3.2\jruby-1.7.4
場所を移動。
% cd c:\redmine-2.3.2
以下のファイルを作成。
- config\database.yml
production:
  adapter: jdbcsqlite3
  database: db/redmine.db
  encoding: utf-8
以下の手順で実行。
 % jruby-1.7.4\bin\jruby.exe -S gem install bundler --no-rdoc --no-ri
    ↓
 % jruby-1.7.4\bin\jruby.exe -S bundle install --without development test
    ↓
 % jruby-1.7.4\bin\jruby.exe -S rake generate_secret_token
    ↓
 % jruby-1.7.4\bin\jruby.exe -S rake db:migrate RAILS_ENV=production
    ↓
 % jruby-1.7.4\bin\jruby.exe -J-Dfile.encoding=utf-8 -S rake redmine:load_default_data RAILS_ENV=production

Select language: ar, az, bg, bs, ca, cs, da, de, el, en, en-GB, es, et, eu, fa, fi, fr, gl, he, hr, hu, id, it, ja, ko, lt, lv, mk, mn, nl,
no, pl, pt, pt-BR, ro, ru, sk, sl, sq, sr, sr-YU, sv, th, tr, uk, vi, zh, zh-TW [en] ja
<= 日本語ならば"ja"を選択
   ※ここでエラーがでるようならば、下記を参考

    ↓
 % jruby-1.7.4\bin\jruby.exe -J-Dfile.encoding=utf-8 script\rails server webrick -e production
    ↓
http://localhost:3000
へアクセス後、admin/adminでログイン
Redmineを立ち上げるたびにコマンドを打つのは面倒なので、バッチを作っておきます。
c:\redmine-2.3.2 の中に
- redmine.bat
@echo off
set PATH=%CD%\jruby-1.7.4\bin;%PATH%
jruby -J-Dfile.encoding=utf-8 script/rails server webrick -e production
※インストールで嵌った件
意味不明な、以下のメッセージが出る。
Select language: ar, az, bg, bs, ca, cs, da, de, el, en, en-GB, es, et, eu, fa, fi, fr, gl, he, hr, hu, id, it, ja, ko, lt, lv, mk, mn, nl,
no, pl, pt, pt-BR, ro, ru, sk, sl, sq, sr, sr-YU, sv, th, tr, uk, vi, zh, zh-TW [en] ja
====================================
Error: (C:/work/redmine-2.3.2/config/locales/ja.yml): expected ',' or ']', but got Key while parsing a flow sequence at line 20 column 5
Default configuration data was not loaded.
ネットで調べてみたら、どうやらファイル開くときの文字コードがおかしいことがわかりました。
文字コードをちゃんと指定してあげると解消されます。
% jruby -J-Dfile.encoding=utf-8 ...
v1.6.8だと問題ないんだけども。。


